Grab My Blinkie

I design for...


About Me

- Alika
- I am Angela aka Alika. PSPing for 8 years, have been making kits for a lil over a year. I have two children. 1 daughter who is 3 and 1 son who is 20 months. You may use my scrap kits in your tutorials or challenges but please link them back to me. Thanks! I would love to see your creations with my kits please email them to alikasscraps@hotmail.com and I will add them to my blog!
Sunday, October 16, 2011
 Smexified Tut- PTU

I am using the smexy artwork of Verymany! You can purchase their art HERE
Scrapkit is a PTU kit called A Bit Emo by Schnegge's Scraps thanks so much hun I love this kit!
Font: Care Bear Love
Plugins: Eyecandy 4000 - Glass, Gradient Glow
Alright smexy biatches lets start, by opening up a new image 600x600
C&P Frame03, resize 80% add a dropshadow to it.
C&P Frame01, make sure it is placed underneath Frame03
Use freehand selection tool to outline middle of Frame03
C&P Paper01, resize 50%, Selections, invert, edit, clear. Move paper layer underneath Frame01
G&P Glitter heart element put at bottom left of frame, add drop shadow
C&P tube of choice, add a drop shadow, duplicate. Drag original below frames layers and above paper layer.
Select copy of tube, use eraser tool to erase extra over the frames and the heart element.
C&P Glittersplat01, resize 50% and place in upper left of frames, dropshadow, duplicate, image flip, image mirror, merge down and drag layer to bottom of layers so its behind frames tube and paper.
Add all the elements you want, be creative, go crazy! Remember lots of elements and placing stuff over tubes makes it hard for pirates to steal!
Add your copyrights, I use timesnewroman size 8 and I put a gradient glow and drop shadow on it then image, rotate, free rotate to the right and moved it over.
Now its time for the name! This is where im hoping to teach ya something new thats not in my other tuts yet!
I used font: Care Bear Family and used the color picker to choose a purple and dark blue from the tag. I hid my foreground and choose my background as a gradient: foreground/background angle 134 with 4 repeats.
Add your text, Convert to raster layer, duplicate!
Highlight the original text go to effects, texture effects and Mosaic Glass, use these settings:

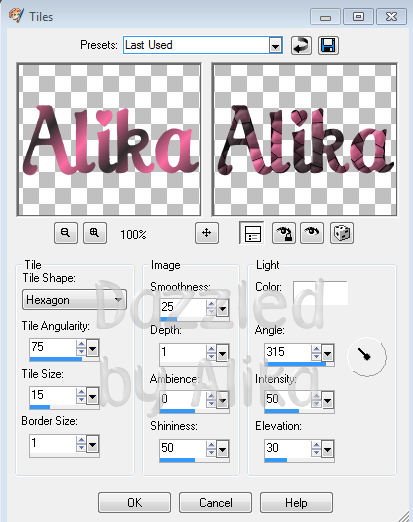
Highlight the duplicated text, go to effects, texture effects and tiles, use these settings:
Add the following glass, gradient glow and then drop shadow settings:


Merge down the two text layers together, use mover tool to place at bottom of frames and save that smexy looking tag!

Subscribe to:
Post Comments (Atom)
Stay Away
My Hideouts :O


1 comments:
VERY NICE!!!!!
Post a Comment